

Print Serving in Depth
This document discusses Microplex print server:
Compatibility Issues
Network Protocols
Microplex's current print server models support multiple environments simultaneously
including:
-
TCP/IP
-
all Unix operating systems
-
PCs, Macs, minis, and mainframes running a third party TCP stack
-
PCs running Windows NT
-
NetBIOS over TCP/IP
-
PCs running Windows 95 or Windows for Workgroups
-
IPX
-
Novell NetWare 3.x
-
Novell NetWare 4.x in bindery emulation mode with NDS support coming
soon
-
EtherTalk
-
Macintosh computers running EtherTalk
Printers
All printers containing a serial port or a standard Centronics interface
will be supported by the Microplex print server line. This means 10-year
old printers to the latest high-speed printers on the market today are
supported as long as they have a serial or Centronics interface. This is
the only compatibility requirement.
Job Types and Sizes
The type and size of a print job never matters to the Microplex print servers.
The print server takes a few bytes at a time passing them off to the attached
printer and never cares what type of data it is or how big the overall
file is. However, the print server can be told to look at the type of data
if something like ASCII to PostScript conversion or automatic emulation
switching (e.g. PCL to PostScript) is turned on.
Architecture and Design
Physical Design
The key parts of a Microplex print server's physical design are:
-
a network connector to attach itself and the printer(s) to the network,
-
a serial or parallel I/O port to attach the printer to,
-
flash PROM to store the firmware code,
-
EEPROM to store configurable settings,
-
RAM to help with print job and network communication processing.
This is an example front and rear view of a Microplex print server - the
M202 model.


Logical Design
Print path
When a print job comes through the print server, there's a certain logical
print path it follows before it gets to the attached printer. It's not
as simple as saying the job goes directly to the I/O port; it must first
go through a sequence of logical steps in case there's any extra processing
to be done to the data. The print path looks like this:
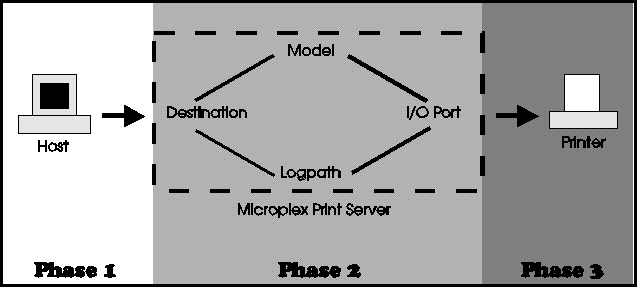
The overall print path for a print job going to a Microplex print server
then is:
-
Phase 1 - The host sends the job to a pre-defined destination/queue
on the print server (e.g. destination "d1prn1").
-
Phase 2 - The job passes through the associated model (e.g. model
"m1") on the print server for any extra processing, through the associated
logpath (e.g. logpath "l1") for any print job or printer logging, and then
goes to the associated I/O port (e.g. PRN1) with the printer attached.
-
Phase 3 - The data goes from the print server's I/O port (e.g. PRN1)
to the attached printer for output.
Note:
Most print methods direct print jobs to the destination/queue in the
initial print setup but in some cases, the print job can be sent directly
to the I/O port. However, every single job that comes to the print server
(no matter whether it's directed to a destination/queue or an I/O port)
will still find its way through the associated models and logpaths.
Destinations/Queues
For every I/O port on the print server, there is atleast one pre-defined
logical print queue or destination to accept print jobs destined for it.
This is where print jobs get sent to with most print methods offered. For
example, if there was a printer attached to the COM1 port, the print jobs
might be sent to a pre-defined destination called "d3com1" in the print
setup rather than to the I/O port, COM1, directly. These logical queues
or destinations are pre-defined by Microplex but the names can be changed.
Models
For every pre-defined destination/queue on the print server, there is a
pre-defined associated model which defines how the print job will be processed
as it passes through to the printer. Models are like a set of mini filters
that add something to the data to change or help the printer output. In
most cases, the print server will not touch the data but there are special
circumstances when extra processing may be desired. For example, maybe
the printer needs to output the data in two-sided landscape form or maybe
the ASCII data coming through needs to be converted to PostScript for the
attached PostScript printer. It is within the models that these options
get set. Once again, the models are pre-defined by Microplex but can be
changed.
Logpaths
With every destination comes a pre-defined logpath as well which determines
what type of print job and printer logging will be done by the print server
for a given I/O port. These too are pre-defined by Microplex but can be
changed.
Built-in Command Shell (npsh)
Within each Microplex print server, a command shell is built in to the
firmware. It's called "npsh" and allows manipulation of objects like destinations,
models, and logpaths. It also provides some viewing capabilities for monitoring
print queues and I/O ports.
These methods can be used to access "npsh":
-
Telnet session (e.g. "telnet printserverIPaddress" - "telnet
192.1.1.1"),
-
serial port login (i.e. terminal or laptop off COM port),
-
npsh.exe Novell executable (e.g. "npsh printservername" -
"npsh M_001C1A"),
-
NPWin Windows software.
When commands are referred to within this document or within the product
manual, these are commands executed once logged into "npsh". The four main
command prefixes within "npsh" are:
-
store - change settings stored in EEPROM only
-
set - change current/working settings only
-
list - view current/working settings only
-
debug - view certain debugging information
Note:
If the "store" command is used, the print server must be repowered
to make the changes take effect. If the "set" command is used, a "save"
command must be done so the settings are retained after power cycles. However,
a reset is not necessary since the changes take effect immediately.
Print Job Spooling and Queueing
Microplex print servers can support up to four printers simultaneously
while supporting multiple hosts and network protocols. They are smart enough
to queue up jobs for every I/O port based on a first come, first serve
algorithm and they have the ability to manage all of this queueing
for every I/O port.
At any given time, the print servers will only hold approximately 3000
to 4000 bytes per I/O port. This means the majority of the print job's
data will reside on the host and through standard flow control methods,
the data will quickly pass over to the print server's buffers on to the
printer's. Though the print server only holds a few kilobytes per I/O port,
it is not the bottleneck in the print path. The printer is always the bottleneck
and comes down to its I/O port speed and its buffer size.
Configuration and Printing
Configuration Tools
The following tools are available for Microplex print server configuration:
-
NPWin - software for Windows stations running IP
-
EZSETUP - Unix shell script that configures print server and host's
print setup
-
npsh.exe - Novell executable that provides way to access built-in
command shell on device
Configuration Steps
To use a Microplex print server, the basic configuration steps are:
-
Attach the print server to the network, attach printers, and power up the
devices.
-
Configure the print server with its network settings if needed.
-
Configure a host to print to the print server.
Attaching to the Network
These steps are necessary to attach Microplex print servers to the network:
-
Plug in the network connection.
-
Attach peripherals to the appropriate I/O ports and power them up.
-
Plug in the print server's power supply and watch the power-on self test
cycle through. When this test is complete, the POWER LED should be on and
STAT should be flashing.
Configuring the Print Server for Use
 TCP/IP - Unix
Environment Description - Unix hosts running operating systems
like Solaris, SunOS 4.1.x, HP/UX, SCO, etc.
Requirements for Use - IP address and subnet mask configured
on the print server at the minimum and a print setup on Unix host saying
where to print to on the print server
Configuration Methods - EZSETUP shell script from Microplex,
manual "arp -s" command, RARP, and BOOTP
Print Method Options - LPD, RSHD (i.e. remote shell command for
System V printing), FTP, and direct socket printing through a proprietary
Microplex binary like NPD or NPWRITE or through a custom application
Suggested Setup:
Use EZSETUP to configure the print server's IP settings and the
print setup on the Unix host.
The steps to do this are:
-
Log in as root or superuser on a Unix host.
-
Insert the Microplex Unix host software medium into the drive.
-
"cd" to a directory with atleast three megabytes of free space.
-
Transfer the compressed tar file from the media onto the Unix host.
tar xvf /dev/devicename
where devicename is usually "fd0" for a diskette.
-
Uncompress this file.
uncompress npdist.tar.1.Z
-
Untar this file.
tar xvf npdist.tar.1
A list of files displays and scrolls up on the screen as tar executes.
Several files and sub-directories are created including a copy of EZSETUP,
the Unix script used for print server configuration.
-
[Optional] Assign an IP address and IP name to the print server in the
host table (/etc/hosts, hosts nis map, or DNS name tables).
-
Run EZSETUP from the command line.
./ezsetup
Note: If running ezsetup on an HP/UX system, you need to explicitly
set the Korne shell by running this command instead:
ksh ./ezsetup
-
Answer the first few prompts that appear so EZSETUP can learn about the
Unix host it's running on.
-
At the Main Menu that displays, enter the number for "Configure New Unit".
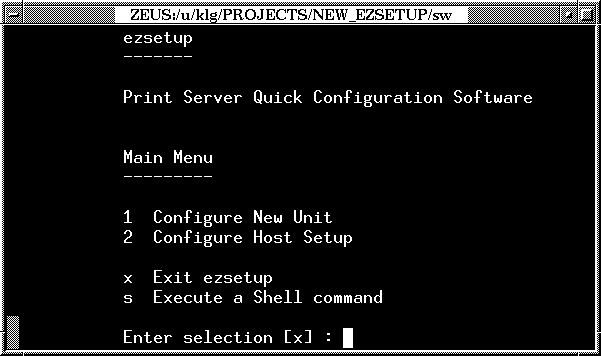
-
Follow the prompts on each screen as EZSETUP steps through the configuration
of the print server's IP address, subnet mask, optional default router/gateway,
and optional root and guest passwords.
At the end of the unit configuration section, EZSETUP will automatically
lead into the "Configure Host Print Setup" section of the script. This
will help install a print setup on the Unix host to print to the Microplex
print server. Simply follow the prompts on each screen until EZSETUP is
complete and once done, try printing using the appropriate Unix print command:
-
"lpr -Pprintername filename" for BSD type systems.
-
"lp -dprintername filename" for System V type systems.
Things to be Aware of with EZSETUP
When going through this host print setup part of EZSETUP, these things
should be considered:
-
Multiple print method options are provided. The best rules to follow are:
-
If the Unix host follows the BSD print system, select the "BSD Remote (LPD)"
option as the print method.
-
If the Unix host is a System V derivative, select the "System V Interface
Script" option as the print method.
-
When asked for a "printer name", choose the name of the print setup (i.e.
the name entered in the print command). For example, a print setup including
an HP III laser printer might be called "hp3laser" for easy identification.
-
When asked for a "destination", choose one of the pre-defined destinations/queues
on the print server. For example, some default M202/M212 destinations include
"d1prn1", "d2prn2", "d3com1", and "d4com2". The product manual lists all
default destinations possible and EZSETUP will show the available options
to choose from.
-
When an "I/O port" or "port" is referred to on the print server, it will
be either "prn", "prn1", "prn2", "com1", or "com2" depending on the Microplex
print server model in use. The I/O ports are labeled right on the print
server itself for reference.
-
When asked to name an interface script (if one is used) in a print setup,
it's best to name it something similar to the name of the printer or print
setup for easy identification. For example, continuing with the HP III
laser printer example, it would be best to call the interface script for
this setup "hp3laser.if".
-
If using an interface script setup, keep in mind that a "dummy device file"
or "device file" is an empty text file that stores request IDs of the jobs
printing. The name should reflect the print setup as best it can for easy
identification purposes as well.
-
Near the end of EZSETUP's "Configure Host Print Setup" section, the script
mentions carriage return insertion and formfeeds. Carriage return insertion
is needed if Unix text jobs are going to be printed through this setup.
This will add carriage returns to solitary line feeds to prevent stair-stepped
output on the printer. Formfeeds are needed if you are printing Unix text
jobs through a "BSD Remote (LPD)" setup. This ensures that the last page
of the print job gets output as well. Otherwise, the "formfeed" button
will have to be pressed on the printer to eject the last page.
TCP/IP - third party
TCP software
Environment Description - PCs, Macs, minis, or mainframes running
third party TCP stacks (e.g. PC running FTP Software's OnNet or NetManage's
Chameleon; MVS mainframe system running TGV's MultiNet)
Requirements for Use - IP address and subnet mask configured
on the print server at the minimum, TCP/IP loaded on the PC and an IP address
and subnet mask assigned to this PC, and a print setup on the PC saying
where to print to on the print server
Configuration Methods - manual "arp -s" command
Print Method Options - LPD (or LPR)
Suggested Setup:
Use manual "arp -s" command and a Telnet session to configure the
print server's IP settings and then do a manual LPD print setup.
The steps to do this are:
-
Find the "arp" executable on the PC running the third party TCP stack.
-
In a DOS window, "cd" to the directory containing this executable.
-
Find the Ethernet address for the Microplex print server on the bottom
of the device. It must be entered as part of this process.
-
Use the "arp" command to add an entry for this print server into the PC's
ARP table. This is the most common syntax:
arp -s printserverIPaddress printserverEthernetaddress
Example:
arp -s 192.1.1.1 00:80:72:00:1c:1a
-
telnet to the print server's IP address either from the DOS window or using
a Telnet program under Windows.
telnet printserverIPaddress
-
Log in to the print server as root.
-
At the password prompt, press ENTER since there is no password set by default.
-
At the prompt that displays (i.e. "ipaddress:root"), store the IP
address and subnet mask into EEPROM on the print server so that it can
remember its IP settings after power cycles. The possible commands are:
store net ifnum addr IPaddress
store net ifnum mask subnetmask
or:
store net ip IPaddress
store net mask subnetmask
Note: ifnum is the index to a network interface on the print
server. With all print server models except the M204, this will always
be the number "1". On the M204, however, this number will depend on which
slot is used for the PCMCIA card. The slot numbers are labeled on the print
server for easy identification.
-
Verify the IP address and subnet mask stored in EEPROM on the print server.
list stored net
-
Exit the Telnet session with "quit" and repower the print server by unplugging
and plugging in the power supply.
-
Wait 30 seconds and then try to telnet back to the print server's IP address
from this PC.
telnet printserverIPaddress
At this point, the print server can be seen on the network. Now a print
setup must be configured on this PC to print to a printer off of the print
server.
With most third party TCP stacks no matter what type of system they
run on, an LPD (or LPR) print setup is used for TCP/IP printing. This LPD
print setup differs between TCP stacks so it's important to follow the
product documentation provided with this software. However, the basic elements
of an LPD print setup on a PC running a third party TCP stack are:
-
Start an ongoing program or redirector to watch over a certain device on
the PC (e.g. LPT1). Every time data comes to this device, this program
will redirect the data over to the remote printer (i.e. the printer off
of the Microplex print server) defined in the LPD print setup.
-
Define an LPD print setup in Windows consisting of:
-
the name of the remote host (i.e. the printer server IP address or host
name in this case).
-
the name of the printer on the remote host (i.e. a pre-defined destination/queue
(e.g. "d1prn1") on the print server in this case).
TCP/IP - Windows NT
Environment Description - PC running Windows NT version 3.5 at
the minimum
Requirements for Use - IP address and subnet mask configured
on the print server at the minimum, TCP/IP loaded on the NT station with
an IP address and subnet mask assigned to this station, and a print setup
on the PC saying where to print to on the print server
Configuration Methods - manual "arp -s" command and NPWin, Microplex's
Windows utility
Print Method Options - LPD (or LPR)
Suggested Setup:
Use manual "arp -s" command and a Telnet session to configure the
print server's IP settings and then do a manual LPD print setup.
The steps to do this are:
-
Find the "arp" executable on the PC running Windows NT.
-
In a DOS window, "cd" to the directory containing this executable.
-
Find the Ethernet address for the Microplex print server on the bottom
of the device. It must be entered as part of this process.
-
Use the "arp" command to add an entry for this print server into the PC's
ARP table. This is the most common syntax:
arp -s printserverIPaddress printserverEthernetaddress
Example:
arp -s 192.1.1.1 00:80:72:00:1c:1a
-
telnet to the print server's IP address either from the DOS window or using
a Telnet program under Windows.
telnet printserverIPaddress
-
Log in to the print server as root.
-
At the password prompt, press ENTER since there is no password set by default.
-
At the prompt that displays (i.e. "ipaddress:root"), store the IP
address and subnet mask into EEPROM on the print server so that it can
remember its IP settings after power cycles. The possible commands are:
store net ifnum addr IPaddress
store net ifnum mask subnetmask
or:
store net ip IPaddress
store net mask subnetmask
Note: ifnum is the index to a network interface on the print
server. With all print server models except the M204, this will always
be the number "1". On the M204, however, this number will depend on which
slot is used for the PCMCIA card. The slot numbers are labeled on the print
server for easy identification.
-
Verify the IP address and subnet mask stored in EEPROM on the print server.
list stored net
-
Exit the Telnet session with "quit" and repower the print server by unplugging
and plugging back in the power supply.
-
Wait 30 seconds and then try to telnet back to the print server's IP address
from this PC.
telnet printserverIPaddress
At this point, the print server can be seen on the network. Now a print
setup must be configured on this NT station to print to a printer off of
the print server.
With Windows NT version 3.5 and higher, the best print setup under its
built-in TCP/IP support is LPD (or LPR). To create a new LPD printer on
this Windows NT box, the steps are:
-
Go to the Main program group.
-
Double click on "Control Panel".
-
Double click on "Printers" which loads up the Print Manager.
-
Select "Create a Printer" from the "Printer" menu.
-
Define a printer name and driver to use for this LPD print setup in the
dialogue box that displays.
-
Under the "Print to" field, select "Other...".
-
Select "LPR port" from the list that displays and click on OK.
-
A dialogue box will display asking for the IP address or host name of the
remote server and for the printer name on that remote host. The "remote
host" being referred to is the Microplex print server so the print server's
IP address should be filled in for the "remote host name". A pre-defined
destination/queue (e.g. "d1prn1") should be put in the field for the "remote
printer name". This tells the LPD print setup where to send the print job
on the print server.
Note: When defining the "remote printer name" with a pre-defined
destination/queue on the print server, be sure to watch out for case sensitivity.
All pre-defined destination/queue names are lowercase.
-
Click OK when done specifying these two fields.
There is now a Windows NT printer defined which uses Windows' own LPR client
to send data to the Microplex print server's built-in Line Printer Daemon
(LPD).
NetBIOS over TCP/IP
- Windows 95 and Windows for Workgroups
Environment Description - PC running Windows 95 or Windows for
Workgroups
Requirements for Use - IP address and subnet mask configured
on the print server at the minimum, TCP/IP loaded on the Windows station
and an IP address and subnet mask assigned to this station, and a print
setup on the PC saying where to print to on the print server
Configuration Methods - NPWin, Microplex's Windows utility
Print Method Options - Print Manager/Browsing setup
Suggested Setup:
Use NPWin to configure the print server's IP settings and then do
a manual print setup using the Print Manager.
The steps to do this are:
-
Insert the Microplex diskette labeled "NPWin and Novell Host Software"
into the floppy drive.
-
Load up the File Manager or Winfile and look under the floppy drive for
an NPWin zip file.
-
Double click on this NPWin zip file to extract all files within it to a
directory on the Windows station.
-
Once extracted to a directory, find the "install.exe" file and launch it
to install NPWin.
-
Answer the prompts in the install program.
-
Once the install process is complete, the Readme file will automatically
load. Read this over and close when done.
-
Find the new NPWin program group and double click on the "NPWin Configure"
icon to load NPWin.
-
At the "Open Print Server Session" dialogue box that appears, click on
ADD to configure a new print server with TCP/IP network settings.
Note:
If prompted for the type of network before this dialogue box, select
"IP".
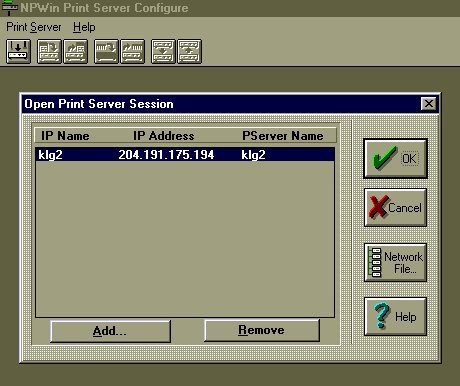
-
At the "Add IP Print Server" dialogue box that displays, fill in the IP
address, subnet mask, and serial number for this print server. The IP name
is optional and depends on whether host names are used on the network.
The serial number is the five digit number on the bottom of the device.
-
Press OK when done so NPWin looks for a BOOTP request to come from the
print server. To speed up this process, the print server can be power cycled.
-
Once a message saying "Assignment Packet Sent" displays, click OK. The
print server now has these IP settings in its current memory.
-
Back at the "Open Print Server Session" dialogue box, select this print
server and click OK.
-
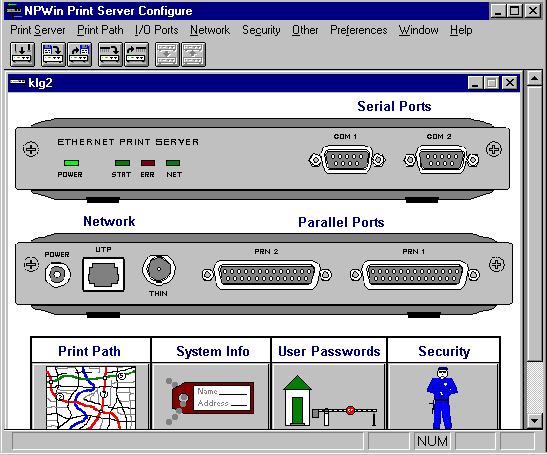
Select "View and Change Configuration" from the dialogue box that appears
next and fill in the SNMP password at the bottom. By default, the password
is "default" in lowercase letters.
-
Click OK to bring up a graphical view of the print server similar to the
one shown below. The IP settings now have to be stored into the print server's
EEPROM so they are remembered after power cycles. Currently the settings
are only in its current memory.
-
Select "IP Interface" from the "Network" menu.
-
Confirm the IP address, subnet mask, and IP name (optional) that display
next are correct.
-
Click on STORE.
-
At the "Reset Unit" dialogue box that displays, select "Reset without Saving"
to repower the print server. This ensures the new settings stored to EEPROM
(i.e. the IP settings) are being used.
Now the print server can be seen on the network so a print setup must be
configured on this Windows station to allow printing to a printer off of
the print server.
The best print setup for Windows 95 and Windows for Workgroups stations
is a Print Manager one. This simply involves finding the print server on
the network by browsing and then selecting a pre-defined destination/queue
on it to print to. The steps to do this are:
For Windows 95
-
Select "Add Printer" icon under the Settings:Printers folder.
-
Select "network printer" from the first window of the "Add Printers" wizard
that loaded.
-
At the next window, click on BROWSE to help fill in the network path to
this printer.
-
At the "Browse for Printer" dialogue box that displays, double click on
the appropriate workgroup containing the print server. By default, the
print server falls under the workgroup, "WORKGROUP", but this can be changed
on the print server by issuing the command "store pserver smb workgroup
workgroupname"
followed by a power cycle.
-
From the list of registered devices within this workgroup that displays,
double click on the print server.
-
A list of pre-defined destinations/queues on this print server should appear.
Select one that involves the I/O port with the printer attached on the
print server.
-
Click OK.
-
Back at the network path window, this path should now be filled in. It
should be in the format "\\printservername\destination" (e.g.
\\M_001C1A\d1prn1). Select NEXT.
-
Select the appropriate printer manufacturer and model for this printer
being set up and then click on NEXT.
-
At the next window, fill in the printer's name. Type in any name or go
with the default and then click NEXT.
-
When prompted to print a test page, select either "Yes" or "No" and then
click on FINISH.
Note:
Windows may ask for the disk or CD-ROM to load the appropriate printer
driver to complete this print setup.
There should now be a new printer icon within the "Printers" folder.
For Windows for Workgroups
-
Open Print Manager.
-
Select "Connect Network Printer" from the "Printer" menu or click on the
appropriate toolbar icon.
-
From the list of workgroups that displays, double click on the workgroup
name that has been set for this print server. By default, the print server
falls under the workgroup, "WORKGROUP", but this can be changed on the
print server by issuing the command "store pserver smb workgroup workgroupname"
followed by a power cycle.
-
From the list of registered devices within this workgroup that displays,
double click on the print server.
-
A list of pre-defined destinations/queues on this print server should appear.
Select one that involves the I/O port with the printer attached on the
print server.
-
Click OK when done.
There is now a print setup using NetBIOS over TCP/IP available to print
to a printer off of the Microplex print server.
Novell NetWare 3.x
Requirements for Use - no configuration is necessary on print
server but new printer must be defined on file server
Configuration Methods - PCONSOLE for the print setup and Microplex's
npsh.exe for additional configuration options on the print server
Print Method Options - PSERVER and RPRINTER
Suggested Setup:
Do PSERVER setup using PCONSOLE.
The steps to do this are:
-
Log in to Novell as supervisor.
-
Enter PCONSOLE.
-
Select "Print Queue Information" from the PCONSOLE Main Menu.
-
Press INSERT to add a new queue to the list of currently-defined queues
showing.
-
Type in the name of this new queue when prompted and press ENTER.
-
Press ESCAPE to return to the PCONSOLE Main Menu.
-
Select "Print Server Information" and press ENTER.
-
Press INSERT when the list of existing print servers displays.
-
Type the name of the print server when prompted for a print server name
and press ENTER when done. By default, Microplex print servers have the
name "M_xxxxxx" where "xxxxxx" equals the last six digits of the device's
Ethernet address (e.g. M_001C1A for a print server showing an Ethernet
address of 00:80:72:00:1c:1a).
-
Back at the print server list, select this newly defined print server and
press ENTER.
-
Select "Print Server Configuration" from the menu that displays.
-
Select "Printer Configuration" from the next menu to display a list of
configured printers.
-
Select the first item listed as "NOT INSTALLED" and press ENTER.
-
At the next window, type in the name for this printer at the top. This
name must be one of the pre-defined destinations/queues on the print server.
For example, if there's a printer off of the PRN1 port on an M202, the
printer name might be "d1prn1" in lowercase letters.
-
Go to the "Type" field and press ENTER to see the possible types.
-
Select "Defined Elsewhere" from this list.
-
Press ESCAPE and select "Yes" to save the changes to this new printer.
-
Press ESCAPE again to return to the "Print Server Configuration" Menu.
-
Select "Queues Serviced by Printer".
-
Select the new printer from the printer list that displays and press ENTER.
-
At the empty queue list that displays, select the queue created earlier
in these steps and press ENTER.
-
When prompted for the priority, press ENTER to select the default.
-
Press ESCAPE until back at the PCONSOLE Main Menu.
-
Repower the Microplex print server by unplugging and plugging in the power
supply.
-
Wait approximately 30 seconds to a minute and then select "Print Queue
Information" from the PCONSOLE Main Menu.
-
Select this new queue and from the menu that displays, select "Currently
Attached Servers" to see which print server is servicing this queue.
At this point, the print server that was defined earlier (e.g. M_001C1A)
should show within this window. This means the Microplex print server knows
about a Novell queue it must service as a PSERVER under Novell. It will
poll this queue every five seconds by default looking for jobs to service
from now on.
Novell NetWare 4.x
- Bindery Emulation
Requirements for Use - no configuration is necessary on print
server but new printer must be defined on file server
Configuration Methods - PCONSOLE for the print setup and Microplex's
npsh.exe for additional configuration options on the print server
Print Method Options - PSERVER and RPRINTER (or now called NPRINTER)
Suggested Setup:
Do PSERVER setup using PCONSOLE.
The steps to do this are:
-
Log in to Novell as supervisor.
-
Enter PCONSOLE.
-
At PCONSOLE's Main Menu, hit F4 to enter bindery emulation mode.
-
Select "Print Queues" from the PCONSOLE Main Menu.
-
Press INSERT to add a new queue to the list of currently-defined queues
showing.
-
Type in the name of this new queue when prompted and press ENTER.
-
Press ESCAPE to return to the PCONSOLE Main Menu.
-
Select "Print Servers" and press ENTER.
-
Press INSERT when the list of existing print servers displays.
-
Type the name of the print server when prompted for a print server name
and press ENTER when done. By default, Microplex print servers have the
name "M_xxxxxx" where "xxxxxx" equals the last six digits of the device's
Ethernet address (e.g. M_001C1A for a print server showing an Ethernet
address of 00:80:72:00:1c:1a).
-
Back at the print server list, select this newly defined print server and
press ENTER.
-
Select "Printers" from the menu to display a list of defined printers.
-
Press INSERT to add a new printer to this list.
-
When prompted, type in the name for this new printer and press ENTER when
done. This name must be one of the pre-defined destinations/queues on the
print server. For example, if there's a printer off of the PRN2 port on
an M202, the printer name might be "D2PRN2".
-
Select this new printer and press ENTER to bring up this printer's settings.
-
At the "Type" field, select "Defined Elsewhere" or "Parallel".
-
At the "Print Queues Assigned" field, press ENTER.
-
Select the queue defined earlier in these steps and press ENTER. If it's
not there, press INSERT to bring up a queue list to choose from.
-
Press ENTER to accept "Priority 1" when it displays.
-
Press ESCAPE and select "Yes" to save the changes to the new printer.
-
Press ESCAPE until back at the PCONSOLE Main Menu.
-
Repower the Microplex print server by unplugging and plugging in the power
supply.
-
Wait approximately 30 seconds to a minute and then select "Print Queues"
from the PCONSOLE Main Menu. Bindery emulation mode should still be active.
-
Select this new queue and from the menu that displays, select "Attached
Print Servers" to see which print server is servicing this queue.
At this point, the print server that was defined earlier (e.g. M_001C1A)
should show within this window. This means the Microplex print server knows
about a Novell queue it must service as a PSERVER under Novell. It will
poll this queue every five seconds by default looking for jobs to service
from now on.
AppleTalk
Requirements for Use - no configuration necessary on print server
and EtherTalk in use rather than LocalTalk
Configuration Methods - Chooser
Print Method Options - Chooser
Suggested Setup:
Do standard Chooser print setup.
The steps to do this are:
-
Select Chooser from the Apple Menu.
-
Select the LaserWriter icon.
A list of available printers will appear. By default, Microplex-related
printers will have a name in the format "printservername_papname"
where printerservername is the name of the print server and papname
is the name of an I/O port on the print server. The printservername
by default is "M_xxxxxx" where "xxxxxx" is the last six digits of the device's
Ethernet address. For example, an M202 with the Ethernet address 00:80:72:00:1c:1a
and a printer off of the COM1 port will have an available printer under
the LaserWriter driver called "M_001C1A_com1".
-
From the list of printers, select one to print to.
This printer is now a valid printer to print to from the Macintosh station.
Management
Microplex print servers offer the following management tools:
-
Telnet Session
Within TCP/IP environments, all Microplex print servers support
Telnet sessions from anywhere on the network. By telnetting into the print
server and logging in as a root or guest user, job status and printer status
can be monitored. For example, the command "lpstat" shows activity on the
I/O ports at a given time and displays the status of the printer at that
moment. Back to back "lpstat" commands will show a print job as it passes
through the print server to the printer.
-
NPWin Windows Software
Microplex print server models come with NPWin, a Windows utility
allowing for print server configuration and monitoring. It runs on any
Windows PC with a loaded TCP stack and sees the print servers on the network.
Here is an example screen snapshot of NPWIN for an M202 print server model:
-
SNMP Support
Microplex print servers are all MIB II compliant but they also
have their own custom MIB support. This custom MIB includes all possible
configuration settings on the print server (e.g. destinations, ports, models)
and supports traps. For example, when the printer status changes on a specified
I/O port, a trap can be sent back to the SNMP Manager or when the print
server is reset for some reason, a trap can be sent.
-
Logpaths
With every pre-defined destination on the Microplex print servers
comes an associated logpath. This explains what type of printer logging
is to be done and where the log information is to be sent. Some possible
types of information that can be logged are:
-
printer errors like out of paper,
-
number of pages printed in a job,
-
user and job IDs,
-
file checksums for troubleshooting.
This information can then be sent to:
-
a designated email address,
-
the SYSLOG daemon on a central Unix host,
-
another I/O port on the print server which has an output device attached,
-
a TCP port number where an application can gather and manipulate the data.
Additional Features
Microplex print servers are the most feature-rich print servers on the
market. With a comprehensive built-in command shell, npsh, multiple features
are provided through simple commands. These are just some of the main options:
-
Versatile Serial Ports
The serial ports on Microplex print servers are not just for printing.
Dumb terminals can be attached to log in to a central network host and
odd serial devices like industrial scales can be placed off of them as
well. Modems can also be attached for remote access purposes with the serial
ports supporting SLIP and in some cases, PPP.
-
Free Flash Upgrades
All of the current Microplex print server models come with flash
PROM allowing for free upgrades over TCP/IP and Novell networks. The basic
steps of the upgrade process are:
-
Get the new firmware file and the supporting download file from Microplex.
-
Load these two files onto an IP station or Novell file server depending
on which protocol is in use.
-
Tell the print server to go into upgrade mode and begin the upgrade process.
-
Wait for approximately five minutes and then log in to the print server
to make sure the new firmware version took successfully.
-
Extensive Options Within Models
Models on the Microplex print servers tell the print server how
to process the job passing through a particular destination/queue. They
are really a series of mini filters each doing something different to the
data if set. Some of these options are:
-
ASCII to PostScript translation,
-
automatic emulation mode (i.e. PCL, PostScript) switching for printers
that can't do this themselves,
-
banner page generation before and after print jobs,
-
header strings allowing for easy printer manipulation (e.g. tell printer
before a job to print two-sided landscape),
-
trailer strings to ensure printer completes job successfully and sets itself
up properly for the next print job,
-
carriage return insertion for Unix text jobs,
-
data descrambling for secure data over the network.
-
Load Balancing Between Printers
If there are two identical printers attached to a Microplex print
server with identical print setups, an alternate destination/queue can
be set for the primary printer. When this first printer is busy, the print
server can automatically redirect jobs to the secondary printer to speed
up print job output.
Advantages over Competitors
The Microplex print server family has the following advantages over current
print server competitors:
-
Most compatible TCP/IP support
Microplex print servers offer the most print methods under the
TCP/IP protocol meaning they will fit in to more IP environments than any
other print server on the market. In fact, every Unix operating system
is supported as well as all proprietary applications. There isn't an IP
setup that a Microplex print server can't service.
-
Most print methods offered in total
Microplex print servers offer the most print methods under each
network protocol. For example, under TCP/IP, LPD, RSHD (i.e. remote shell
command with System V printing), and FTPD are supported as well as direct
socket printing through telnet, pseudo-tty's (i.e. proprietary software
called NPD and TTYD), or through an application sending data straight to
a TCP port number on the server. Microplex servers are the most versatile
print solutions on the market.
-
Reliable simultaneous protocol printing
At any given time, a Microplex print server can support all attached
printers printing at the same time. This means it can also support multiple
protocols and multiple hosts at the same time without any job loss or job
mixing.
-
Most reliable printing with large jobs and overloaded print areas
As one of the original manufacturers of print servers, Microplex
has had a head start on its competition. This means there's been a longer
period to stabilize printing especially with multiple protocols and larger
jobs. With Microplex print servers, no job is too large and there's never
a point where there's too many jobs queued up.
-
Best printer logging for non-Windows environments
Within Windows environments, almost all print server manufacturers
now provide Windows software to help configure and manage their print servers.
For example, Microplex offers NPWin. However, when there isn't a Windows
box around or if it isn't desirable to run a program all the time on a
dedicated station, what is there to rely on? Microplex's answer is logpaths.
If there's a printer problem, have the print server send email to the network
administrator or have SYSLOG messages sent directly to a centrally managed
SYSLOG daemon. Place a terminal or printer off of a serial port on the
print server and have it output logging information there for user records.
Log specific information to a TCP port number on a Unix host where an application
can gather and manipulate the feedback. The logging methods are virtually
endless on Microplex print servers.
-
Most feature-rich print servers
Microplex print servers provide the most complete built-in command
shell allowing for numerous processing options. Alter everything from the
data format to the printer settings to the serial port usage.
-
Fastest throughput rates on parallel ports
Microplex print servers' parallel ports can reach speeds of over
200,000 characters per second (cps) sustained matching some of the fastest
printers on the market today.
-
Best on-board troubleshooting tools
Using Microplex's comprehensive built-in command shell, npsh,
several troubleshooting tools are offered to help monitor network connections,
memory usage, protocol stacks, and data transfer. Each of these can be
done remotely allowing troubleshooting from anywhere on the network.
-
Most versatile serial ports
Microplex print servers make the most out of the serial ports.
Since most printers today use parallel ports for data transfer, most serial
ports get left unused. Microplex addresses this by providing SLIP and in
some cases, PPP, support for remote access. In addition, thanks to the
many print and communication methods available, the serial ports can be
used for dumb terminals and other output devices or for odd equipment like
scales and pill dispensors. Microplex print servers are used for more than
just printing.
Common Troubleshooting Tips
These are some of the most common problems reported with Microplex print
servers. For each problem, a description is given along with steps to solve
the problem.
For TCP/IP
Print Server Won't Talk on Network
Sometimes the print server won't communicate over the network from the
beginning or it will suddenly stop communicating after working for a while.
In these cases, customers most often think something has gone wrong with
the device meaning an RMA is needed, but 75% of the time, the problem is
related to configuration or network problems. Therefore, the things to
check when this happens are:
-
Is the network cable going to the print server working? Try different network
cables and locations to help narrow down the problem.
-
Has another network connector on the print server been tried to help narrow
down the problem to a particular print server network port? A transceiver
would be needed to try this other port.
-
Has there been a change to the network recently that might affect this
print server's communications? For example, on a TCP/IP network, a new
device added to the network could be accidentally using the same IP address
as the print server.
-
Has there been a change to the device itself? For example, maybe the device
has been moved to a new location or maybe somebody has changed a key network
setting.
-
If this is a brand new installation, is it confirmed that the network station
trying to talk to the print server resides on the same subnet? At first,
the print server can only be seen on its own subnet until it can later
be told about a default router/gateway.
-
Is there a RARP or BOOTP server running on the network? If so, the print
server will send out a RARP and BOOTP request by default upon bootup so
even if the network settings have been stored in EEPROM, the device may
gain a new IP address from one of these servers. RARP and BOOTP can be
turned off within the print server though using the "store net" command
prefix. Simply type this in once logged in to the print server's command
shell, npsh, and looking at the output that displays, use the command referring
to RARP and BOOTP.
-
Has a special event taken place such as a lightning storm or power surge?
If so, did other equipment on the network get affected as well? Is there
anything different about the LED pattern on the front of the device (e.g.
ERR LED comes on) after waiting 30 seconds after bootup?
-
Has the print server been put back to a factory default mode by using the
appropriate jumper on the device's board? Sometimes setting things back
to square one and then redoing the network setting configuration helps
kick things into gear.
Nothing Prints
Most often when nothing prints, the problem is with the configuration whether
it be the host configuration or the print server configuration. Rarely
is it a problem with the hardware (e.g. I/O port interface) unless it's
the printer cable or printer itself having troubles.
What's important to find out with this problem is where exactly is the
print job faultering. Therefore, start with the basics (i.e. take the network
right out of the picture) and work backwards towards the host end. The
steps to consider when this happens are:
-
Is it still possible to communicate with the print server over the network?
If not, printing will obviously be affected so look for reasons why communications
have stopped.
-
Is there a working printer attached to the print server I/O port that is
ready to go and not in an error state? Use the "lpstat" command within
the print server's command shell, npsh, to see whether or not the print
server's I/O port recognizes that attached printer.
-
Are the printer and printer cable okay? To test this hardware, use the
FOX test built in to the print server's command shell, npsh. This sends
an ASCII line over and over again to the attached printer ruling out the
network side of things completely. The most common command syntax for this
FOX test is "start fox portname" (e.g. "start fox prn1") followed
by "stop
portname" (e.g. "stop prn1").
-
Is the job leaving the host and getting to the print server? Once again,
use "lpstat" on the print server to see if the job registers on the appropriate
I/O port or simply check the host queue to see if the job gets stuck there.
If it is stuck on the host, the problem is the spooler configuration most
likely unless the print server can't be communicated with over the network.
-
Is the job format or type (e.g. text, PostScript) being sent supported
by the attached printer? For example, sending a text job to a PostScript
printer will not produce any output. The printer will choke on this since
it is not PostScript code.
-
Is it only certain jobs that are failing? For example, maybe a particular
application's jobs aren't printing but other jobs are. If that's the case,
then look at this application's print output to make sure it matches the
printer's emulation (e.g. PostScript) and also look closer at its print
configuration. Is the job able to get from the application to the right
print setup on the host where it can then be sent to the print server?
Stair-Stepped Output
This refers to any Unix output that starts on the top left of the page
but every line thereafter, starts a little more over to the right rather
than coming back properly to the left margin. It also refers to Unix jobs
that print one line at the top of the page but then follow that with blank
pages rather than the rest of the job.
The reason for this funny output is the lack of carriage returns in
the job. The printer may be told to do a linefeed but this may not be followed
by a carriage return to start the next line at the left margin. Therefore,
the printer does a linefeed but then starts the next line where the previous
line left off.
This should only happen with Unix text jobs and to avoid this, some
type of carriage return insertion must be added in the print path. The
easiest and most common location is on the print server itself within the
approprite model. The feature is called "onlcr" and to see the correct
command on the device to set this on or off, enter "set model" once logged
in. Then pick the command referring to "onlcr".
Note:
Be careful not to double up on this carriage return insertion or else
the output will be double-spaced.
No Formfeed or Extra Page Comes Out
Unix text jobs may also have problems kicking the last page of the print
job out of the printer especially if the LPD print method is used. This
means the formfeed button has to be pressed right on the printer to get
this last page out.
To make this process automatic, tell the print server to handle the
manual formfeed by setting this feature on in the appropriate model. The
command structure on the print server is "set model modelname trailer
$FF" (e.g. "set model m1 trailer $FF"). The "$FF" is a pre-defined variable
on the print server which equals the proper hexadecimal code for a formfeed.
Note:
Be careful not to double up on the formfeed or else the job will eject
properly but with an extra blank page at the very end.
Garbled Output
Garbled data means any output that does not look as it should. This can
range from missing or overlapping characters to funny spacing. Most often
it is caused by some extra unwanted processing done to the job as it passes
through its print path or else it may be related to the hardware involved.
No matter what, 99% of the time it is fixable without having to bring a
print server back for repair. Therefore, the things to consider if this
happens are:
-
Has a basic test like the FOX test been tried to confirm basic communications
between the print server and the printer are okay? Narrowing down the problem
is the most important step in trying to determine where the garbling is
happening and the FOX test concentrates solely on the print server's I/O
port, the cable, the printer, and the communications between the print
server and the printer. The network and host are not brought into the picture
at all. This way if the data garbles here, the problem is definitely hardware
related.
-
Has the printer output ever been proper with this setup? If not, there's
a configuration error or the data is getting processed on its way to the
print server for printing. If it did work at one point and then started
garbling, something might be failing like the printer cable or the flow
control between the print server's I/O port and the printer. The FOX test
will help with this. In addition, maybe somebody turned on some extra processing
somewhere (e.g. onlcr) along the print path which these print jobs don't
like. This would most likely be turned on at the print server in a destination's
model.
Note:
The most common extra processing that causes garbling is onlcr which
provides carriage return insertion for Unix text jobs. This tends to garble
any jobs coming from non-Unix hosts so be sure to have this off with any
non-Unix printing. If printing from both PCs and Unix hosts is needed,
two separate setups are recommended: one with onlcr on and one with it
off.
-
Are you sending a job format (e.g. PCL) supported by the attached printer?
-
Is the data leaving the host in a proper format or is it getting garbled
before leaving the host? Sometimes capturing the job to a file first and
then viewing this file can help tell where the garbling is occurring.
-
Is there an old firmware version inside the print server? There are some
versions that have I/O port bugs which garble output so it's recommended
that the latest firmware version be used. Please contact Microplex Technical
Support for further help with this or feel free to check out the "Support
Shack" at Microplex's Web site for the latest firmware code and instructions.
For Novell
NPSH.EXE Fails to See the Print Server (all NetWare versions)
npsh.exe is the Microplex executable that allows a telnet-like session
with the print server in a Novell environment. It simply allows a NetWare
workstation on the same LAN segment to log in to the device and use its
command shell, npsh. It is not mandatory but is there if some extra
configuration is desired. However, sometimes this fails to work so these
points should be considered:
-
Was the correct syntax used to log in to the print server? The recommended
syntax is:
npsh printservername
e.g. npsh M_001C1A where "printservername" is the default name of
the print server. This is all uppercase letters and is in the syntax
"M_xxxxxx" where "xxxxxx" equals the last six digits of the print server's
Ethernet address found on the bottom of the device.
Was npsh.exe attempted from a NetWare workstation on the same LAN segment
as the print server? This utility is broadcast-based so it cannot go across
routers.
If npsh.exe fails from one workstation, has another NetWare station been
attempted?
What is the print server's firmware level? There are a few firmware levels
with npsh-related bugs in them. Therefore, upgrading to the latest firmware
level is recommended. Please contact Microplex Technical Support for further
help with this or feel free to check out the "Support Shack" at Microplex's
Web site for the latest firmware code and instructions.
Note:
If npsh.exe fails and a certain setting has to be configured on the
print server, a Telnet session can be used if TCP/IP is available or a
laptop/PC/dumb terminal can be attached to one of the serial ports for
a login session.
NetWare 3.x - No PSERVER Connection
The most important aspect of a Novell setup is getting the connection from
the Microplex print server to the Novell file server. If this doesn't happen,
printing will never happen. Jobs may go to the file server print queue
but they will never get any further until this network connection has taken
place. Therefore, the things to consider if this happens are:
-
Have all of the PCONSOLE steps in the product manual or supporting documentation
been followed?
-
Has the Microplex print server been power cycled once the PCONSOLE steps
were completed? This will make the print server boot up and realize which
print setup it needs to service.
-
When defining the "print server", was the correct name used as outlined
in the Microplex product documentation? This name by default, should be
in the format "M_xxxxxx" where "xxxxxx" equals the last six digits of the
Ethernet address printed on the bottom of the device. For example, an M205
product with the Ethernet address "00:80:72:03:00:1a" would be named "M_03001A"
by default.
-
When defining a "printer name" within the PCONSOLE steps, was a valid pre-defined
Microplex destination/queue used for this name? For example, if there's
a printer off of PRN2 of an M202 product, this printer name could be "d2prn2"
in lowercase letters to match one of the default destinations on this model.
This way the device knows what I/O port to direct the data to since there's
several I/O ports to choose from.
-
Is there an available NetWare user license for this Microplex print server
to utilize? Every PSERVER takes up one user license.
-
Is there a Novell file server on the same LAN segment as the Microplex
print server? If not, can SAP reqeuests get through any bridge/router linking
the device to other, distant file servers? The print server will send out
a SAP request looking for valid file servers on the network but since this
is broadcast-based, this may not get through to all segments. If this SAP
request can't get through to the right file server, the print server will
have to be put on to the same segment as the desired file server.
-
What is the print server's firmware level? There are a few firmware levels
which have important Novell-related bugs in them which will definitely
affect PSERVER connections. Therefore, upgrading the print server to the
latest firmware is highly recommended. Please contact Microplex Technical
Support for further help with this or feel free to check out the "Support
Shack" at Microplex's Web site for the latest firmware code and instructions.
-
Is there connection numbers greater than 256 on the network? If so, atleast
firmware version 5.4.4 needs to be used on the print server. Please contact
Microplex Technical Support for further help with this or feel free to
check out the "Support Shack" at Microplex's Web site for the latest firmware
code and instructions.
-
If worse comes to worse, has the TRACK ON console command been used to
see what's happening between this file server and the Microplex print server?
By turning this on, packets (and NetWare calls) can be captured going between
the two network devices. The best test is to turn this command on once
the PCONSOLE setup has been completed and then repower the print server.
The trace should then show the print server send out a "Get Nearest Server"
call and the file server should then respond with a "Give Nearest Server"
call showing they see eachother. After this point, look to see if the print
server attempts to contact the appropriate file server for print servicing.
NetWare 4.x - No PSERVER Connection
Most of the problems and suggestions listed under the "NetWare 3.x" section
above apply to NetWare 4.x environments as well but there are a few additional
points to consider if a PSERVER connection fails under NetWare 4.x:
-
When the PCONSOLE setup was done based on the product documentation, was
F4
hit once the PCONSOLE main menu displayed? This will put PCONSOLE into
a special bindery emulation mode which is currently required for
Microplex print servers acting as PSERVERS in NetWare 4.x environments.
All print setup steps are then to be done under this special mode.
-
Does your print server have a firmware version prior to 5.4? If so, a modification
will have to be made on the device before the connection can be established.
It involves logging in to the device's command shell using npsh.exe, telnet,
or a serial port login and renaming the destination/queue in use to all
uppercase
letters to match the definition in PCONSOLE. For example, there's an M202
at version 5.3 with a printer off of the PRN1 I/O port. The PCONSOLE print
setup directs the print jobs to the pre-defined destination/queue "D1PRN1".
(NOTE: NetWare 4.x's PCONSOLE forces this name to all uppercase letters).
Since the print server will not recognize this name, it must be told to
understand uppercase letters. The commands on the device to do this are:
set dest destinationname name newuppercasename
save
e.g. set dest d1prn1 name D1PRN1
e.g. save
Has the print server even logged in to the Novell file server? It's a good
idea to check the file server for which devices have logged in. Then if
this print server shows as being logged in but not connected to the print
queue, the problem may be a rights/permission issue. This print server
must be allowed to service this print queue and this print queue's users
and access should probably be "everyone" to play it safe.
The last thing to remember with NetWare 4.x PSERVER setups is that bindery
emulation mode is dealt with. This means anything to do with this setup
must be viewed under this mode at all times.
For Windows NT
Windows NT printing is fairly straight-forward and simple so there's not
a lot to troubleshoot. However, since TCP/IP is used as the core network
protocol, feel free to use the tips listed under "For
TCP/IP" found earlier in this section.
Printer Errors
In addition to the TCP/IP-related issues, there may sometimes be situations
where various printer errors come up on the NT box. If it happens when
defining a new LPR printer, be sure that the right IP address (or IP name)
for the print server is defined and the right pre-defined destination/queue
name is given. Most often this second field is entered incorrectly
causing setup errors so be sure to:
-
use a pre-defined name from the print server (e.g. "d1prn1").
-
use lowercase letters since all destinations/queues on the Microplex print
servers are lowercase by default.
If printer errors occur later when trying to print, check that the printer
attached to the print server is ready to go and make sure the Windows station
can still communicate with the print server over the network. "ping" is
a good test for this. If all attempts fail, a reboot of the Windows station
is sometimes the only option left but it works almost every time.
For Windows 95 and WfW
If there are communication problems under either of these environments,
be sure to check out the problems and suggestions listed under For
TCP/IP found earlier in this section since TCP/IP is involved. If there
are printing issues, continue on.
Can't Browse the Microplex Print Server
Sometimes when defining a new NetBIOS over TCP/IP printer using the browsing
technique, the print server doesn't always show right away. If this is
the case, be sure to check:
-
Has the right workgroup been looked under for this print server? By default,
the print server will be found under "WORKGROUP" but this is changeable
using the command "store pserver smb workgroup workgroupname" on
the device followed by a power cycle.
-
Has this Windows workstation been given a while to update its registry
so it can see this newly added workgroup device? Sometimes Windows stations
can take an hour depending on the size of the network and the decision
process used to figure out which station will act as the Master Browser.
This means though the print server is on the network and telling other
network devices it is there, the Windows boxes aren't updating themselves
quickly enough.
-
Does the print server have firmware version 5.6 or higher? Browsing support
was introduced at version 5.5.2 but some fixes were made shortly after.
Please contact Microplex Technical Support for further help with this or
feel free to check out the "Support Shack" at Microplex's Web site for
the latest firmware code and instructions.
If help is still needed, look to "Getting Help with
Microplex Products".